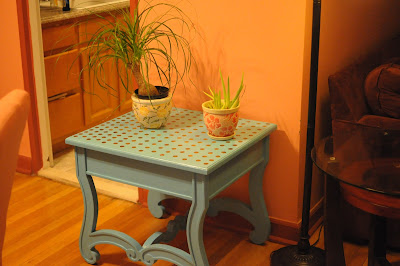
Hi Everyone! I know I have been MIA lately - and sorry for the lapse. Good news is I completed my 30 day yoga challenge I discussed here. Bad news is I didn't do so good with my blogging challenge. I may have taken on too much, and 30 days, 30 blog posts is a bit much. I think I need to lower my goal to at least once a week! BUT more good news is I have been working on a bunch of new projects - so I have lots to blog about in the upcoming weeks! And here is the first one! I am sad to admit that I started this project back in November =/ and yes I can say that Hurricane Sandy offered the first delay but lets just say it didn't go exactly as planned. BUT it offers a good lesson that not every DIY project you tackle will work out and it is def. an improvise as you go kinda process. SO let's get down to it. I will show you the before and after first and then take you through the woes and wows!
SO my friend found this beauty in her laundry room - someone had discarded it - it was in a little bit of rough shape with that missing drawer and some grime and scratches. But it had good bones - nice sturdy wood and gorgeous lines. Perfect candidate to be stripped and painted! I couldn't wait to get my hands on it.
Here are some more after pics before we delve into the process.
First I sanded the table to see what we were dealing with! This is what we found underneath ...
(of course Jules was all over this process) he really likes when I bring new furniture into the house. He thinks I bring it home for him.
SO the wood was good underneath it was hard to sand all of the former stain off of those grooves in the legs so they def. needed to be painted there. I wanted to bring in a nice punch of a cool color to my friend's place as currently she had all warm tones and was looking for a punch! We landed on Behr's Tropical Tide Blue and I went with the Flat/Matte paint since I planned to put a polyurethane coating on top.
SO my first idea was to paint the legs and do a special treatment to the top. I ordered some marbled paper that I wanted to adhere to the top and put a protective coating over so it could be used as a table top surface. It was going to be gorgeous (so I thought...). The legs were painted all was good...
I placed the paper on the top (how gorgeous is this paper!?) And how great does this look? I ordered it from Paper Mojo here. I used some spray adhesive underneath but being as this is a table surface it needed a protective coating...
But as soon as I tried to apply a coating of Polyurethane - BOOM - OUCH - I even attempted this spray on clear enamel - more BOOM and more OUCH - here are the murderers now...
Look what they did....
I pretty much cried immediately it was like a crashing car I couldn't stop - the damage was done. I attempted to cut the damaged part off (of course I didn't order enough paper to try again - that stuff ain't cheap and stock was low!)
But I knew deep in my heart this was not going to work - it would never be a functional table and my vision was wrecked. Hence the several month delay to the resurrection of this project. I had to first GET OVER IT... and then come up with a new fabulous idea. A LOT of pressure. But lucky for Jules he got to occupy this table for longer than originally planned.
There was a spot on the table that was not taking the stain properly it was something on the table I am not sure but it was an obvious flaw - that would not work in the long run. (sorry I didn't take a close up of it but take my word for it - it looked like someone rubbed their snot in that part of the table - eww).
SO I decided that to stencil out a design on the top (that would ultimately cover the snot). I was inspired by this table here - but wanted something a little more playful!
So I got some little round stickers and placed them on the table top over the stain.
Then I painted over the stickers and crossed my fingers that this would work. I waited for it to dry before I lifted all the stickers up hoping to find perfect circles - almost a polka dot look underneath.
AND TaDa! It worked. (Phew!)
SO it wasn't my original vision but my friend loves it and it gives her just that color punch that she needed!
And as you can see DIY is no piece of cake and sometimes we need to make sacrifices for beautiful functioning hand altered (in my living room) furniture. OK until next time!
-Kim


